About Me

My photo
Based in Northampton, UK, I live with my husband Adam, our Cocker Spaniel Bruno and Deeley the Bengal cat. I work full time as a Creative Artist / 3D Designer and part-time with my creative endeavours. I hope you'll enjoy reading about my work and other random ramblings, from the satisfying successes to the catastrophic failures! Still, it's all good fun, which is kind of the whole point really...

Tuesday 2 December 2008

A week full of surprises.

  • Happy December!! How'd that happen?? I think I'm still in August - where did Autumn go?!?!? I hope all those that enjoy Thanksgiving had a great day!!
  • I'm back to the bullets today! too many paragraphs and not enough photos to break them up. Or maybe not given I've got 9 photos in this one! Please let me know if blog posts like this cause problems with inbox limitations etc, I'm still finding blogging a bit of a mystery with strange rotating photos (I didn't do it!) and paraghraph breaks being mysteriously eaten away!

  • A bit of a shameless brag today I'm afraid, I have new things I want to show off!
  • I've had a lovely week full of treats! Following the completion of the portrait of Flint last week, Sarah (who commissioned it), asked me if I wanted paying with money or goods. Well, given the financial climate and the fact that any money I receive for artwork goes towards paying things that need paying, and the fact tha Sarah is family and I never feel comfortable taking money from the folks; I thought I'd opt for the "goods" this time - heck, the day-job's for paying boring bills!
  • Sarah knows me very well and understands how my mind works. I told her a few things I'd be interested in and she brought me some lovely goodies! The photo below shows my week's haul, although that silver case is a rather interesting one...
First (pictured below) - this is something I've been after for a little while; a table-top box easel. As my works always have to travel around with me, I often find myself carried any number of bags and cases, it can get pretty awkward. I wanted a box easel to a) help me get the items I need into one place and make them easier to carry about, and b) raise up any pad/canvas off the table, as drawing on a flat table is pretty hard on my back and shoulder (I'm sooooo old and decrepid y'know!). This Easel has a few extra treats supplied with it - a nice canvas, a set of acrylic paints, some brushes, pencils and paint trowels. I've not yet ventured into painting portraits, but now I'm well equipped to give one a go! In actual fact the paints will eventually be replaced with pencil crayons/blu-tac/paper pads/pastels etc. Sarah also presented me with this small, simple little box (not sure why the photo has rotated or if it will be rotated in the email blogs, but if it looks odd tilt yur head to the right) his little box is actually a brilliant piece of engineering! It opens out like a toolbox, and has two built in legs which hold it steady and level. I knew what I'd use it for as soon as I saw it... ...Pastels!! I have one box of 36 pastels which have their own wooden case, and a lovely wooden set of 12 Caran D'ache pastel my Dad bought me about 16 years ago (I was rather unimpressed att eh time, shame on me!! They my most cherished materials now!) but the other individual and smaller sets were all kind of loose and awkward, so I completely demolished their packaging and arranged them into the new box. I don't know what wood it is constructed from, but it has a beautiful grain (I took the pics with a flash last night so haven't done it justice), and a lovely simple but beautiful brass inlay. The box is also lined with a velvet type material, but as I'm using it for pastels I've added some foam lining so I don't ruin it. Finally, this one is a rather unusal story with a great ending - this aluminium case and it's contents were a gift from Sarah and her partner. Her partner works fixing machinery, I don't know exactly what he does but he travels around a lot and mends broken machines. Turns out that some of these machines are in tanning salons. In a previous job of his, he was given some items and this had been sitting around gathering dust so it was kindly offered to me. Yep, you read it right - it's an airbrush tanning system! Now, I'm not really into the body beautiful. I try to look respectable but have never really been into tanning, especially spray-tan; so was a little confused when offered this. BUT, on opening it up, suddenly it made sense - can you see what caught my eye in the photo below? THIS did! It's a small, pink compressor! Also in the box which has me intrigued is this item:
  • So, I'm now the proud owner of a delightfully girly compressor and airbrush! Ok, so perhaps the airbrush might need replacing (I know nothing of these things yet) but suddenly my horizons are widened; not only with the (oh so tempting) possibilities for painting models, but also for casting - if I can finally get my hands on a pressure pot I will have all the equipment I could need for excellent casts!
  • I still don't know much about this fabulous new arrival, I don't know what pressure it will push out, I don't know if the airbrush works and even if it does it's missing some mixture pots (the pots that attach to the airbrush, that hold the paint mixure - whatever they're called).
  • I don't know if this is normal, but I always find "trading" (ie taking goods instead of payment) so much more satisfying than taking money. Of course, money never hurts, but I like a good old-fashioned goods exchange!

Friday 21 November 2008

It's finished!! Here is the completed drawing of "Flint", hope you like it Donna! You should be able to click the above photo for an enlarged view. Aha! As I type, Sarah (who commissioned me to draw this for her friend, Donna) has sent me some photos of the picture in the frame she bought. Here it is (I'm promised a pic of it mounted on the wall soon, and will share when that arrives).

Sarah sent me a text over the weekend that read as follows:- "I gave Donna the picture last night as I couldn't wait. She instantly cried as she was so happy with it and knew it was Flint the minute she saw it. She said it looks just like him.". Sarah also told me that Donna's parents were moved when they saw the drawing and spent quite a while comparing it to photos of Flint and commenting on how accurate it is.

.

I have another commission coming up; a much more challenging drawing! Details on that to follow.

Monday 17 November 2008

Pastels, pets, portraits

  • I've been delighted recently, to receive a few commissions for pet portraits; two of which came directly from this blog! It's given my confidence a huge boost :o)
  • This Portrait, however, came from family. Adam's little brother's girlfriend (keeping up?), Sarah, asked me a few weeks ago if I would consider drawing a portrait of her friend's dog, called Flint. Sadly Flint passed away (at a ripe old age) and Sarah felt that a portrait of him would be a nice gift for his owner. Sarah presented me with a small, dogeared photograph that she had "borrowed" from her friend's house; I had to scan it and get it back to her asap so she could smuggle it back in, hehe!
  • Now, firstly I'll point out that I don't know Sarah's friend and she doesn't know me (other than a passing face at the family BBQs), so I feel happy that I can blog about this without her finding out.
  • Secondly, I have to comment on how lovely this dog is - as soon as I saw the picture of him I was in love. He's a German Shepherd dog (I believe) but is a gorgeous golden colour. The colours in his coat, and the lovely way his fur flows meant this was a fantastic portrait to take on, especially as I'm still finding my way in this field.
  • And thirdly, I have to express my complete surprise at how this small 5"x3" photo, taken a number of years ago (when Flint was in his prime) and in a rather sorry state, enlarged - I was amazed with how much detail was in that tiny photograph! I scanned it in at 1200dpi and have enlarged it to A3 (16"x11" I think) with virtually no quality loss! I've no idea what kind of megapixel digital camera would be required to reproduce such detail!

And this is the same scan at after I was done fixing it up. I'm easily distracted and was finding the scuffs getting in the way of my "seeing" the dog, so I patched it up - which has quite conveniently made for another gift for Sarah's friend should she like to have a larger copy of her photo. Again, this image was reduced in size to blog, but I think you can get the idea.

As I've managed to get this far without actually sharing in-progress photos, here are two; this one was from last week. I have "discovered" pastels with this portrait - after the recent drawing I did of the Border Collie using normal pencil crayons on a dark packground, I was quite wary of "losing" the portrait. I don't know how to explain this, but if you compare pencil crayon drawings with pastel ones, especially on darker paper, the pastel ones seem to "glow" somehow. This in mind, I chose to try pastels for this portrait and at least block in the colour using them.

I was really pleased with the results using the pastels, and after having a few hours over the weekend and today's lunchbreak at work (have I mentioned how lovely my boss is...?) to spend working on the drawing; here's the results at this point.
I think I will be returning to the normal pencil crayons soon with this one; I just can't get the fine detail that I'm so obsessed with (hey, I'm a Virgo, what can I do??) using pastels alone. So, in true experimental fashion I'll be giving the pencil crayons a go, in the hope that this lovely "glow" I've managed to stumble on using the pastels will remain, whilst still allowing me to add in the fine details that I love. I'm mildly concerned that I may overwork this portrait, but I won't know unless I try, and the pad i'm using has 24 sheets in it, so if I truly stuff it up, I can happily re-do it. I have until Christmas, that's ages, right?...
I just have to add in this photo, of Deeley (the "other" cat) helping me! I think perhaps she'd prefer it if I kept to drawing cats!! Or maybe she's just reminding me that I've not done HER portrait yet, hehe!

Wednesday 12 November 2008

Edible delights all everywhere I looked!

  • Sometimes, you just CANNOT be good. However well-intentioned you are (which to be honest, I'm not very!) sometimes you just find yourself surrounded by edible delights that are just so indulgent, you just have to throw conscience to the wind and enjoy them!
  • Last weekend was one of those times. On Friday I went to visit my friend Emily Prouse. She's one of the "ones-to-watch" in this hobby, her finishwork is incredible and her re-scuplting is showing great promise. She's still at school so when I go to visit her, I also get to meet up with her parents, who are two of the most creative and inspirational people I know - I can easily see how Emily has become such a talent!
  • Anyway, on Friday I made a quick visit to say hi and to pick up a gorgeous painted copy of Pickle V2 that Emily kindly offered to paint as a 30th Birthday gift to me! We had talked about colours and as I already have a gray copy and a deep bay pinto copy, and as Mulberry gray is practically unheard of in Arab horses; Emily painted this copy to a beautifully rich, colourful Rose Gray. In this photo the eyes aren't glossed but I can vouch for their quality (Emily does FANTASTIC eyes!) and there is also a multitude of little hair-details that you can't even see in the photo.
  • THANK YOU Emily, this is a super-special model that I will cherish! :o)

  • Whilst visiting Emily, it was a lovely surprise to find that her Mom had baked a cake for my visit - how lovely is that?! This cake, my, oh my, this cake... well, the photo below should show just how gorgeously indulgently FABULOUS this cake was - we each had a more-than-generous slice topped with vanilla ice-cream, mmmmm!!! Just look at that steam, fresh from the oven gooey richness.
  • You know you have a great friend when they know just what level of indulgence to offer (in my case - EXTREME!)!!
Now, on to something not edible, but generally food-based. Now I know I'm late here, but that's the story of my life (living a few paces behind the rest of the world!). I've never carved a pumpkin before - now I know I was a week late with this one, but we'd bought it ready for Guy-Fawkes but not had a chance to carve it; we had a big fireworks bach over the weekend at Adam's parents' house so I took the opportunity and carved this guy - he's munching a cucumber end. I was quite pleased for a first attempt! I also found it very therapeutic, but perhaps that's my Savage side coming out...!
The final icing on the cake, so to speak, came not from me, but from Adam - he's a bit handy in the kitchen when we're not restricted to dinner "a-la-ding", and he fancied making some home-made marshmallows for the family event. Ok, they may not look as neat and tidy as the supermarket types, but that just added to the home-made speciality of them and they tasted great!! This plate-full was kept back and we brought it home, and during this week (we're only on Wednesday!!) the marshmallows have steadily disappeared - now I know I didn't eat ALL of them... ;o)
Back to more artistic endeavours next time, I just felt I had to share in these delights!

RESS Windward

  • Urgh, just when I think it's safe to ditch the bullets, the paragraphs get all mushed together again! Apologies for that - I'll play safe with the bullets again this time (that was an odd sentence to write!)
  • Now, the reason that some of my sculptures are on hold, well, one of them anyway, is thanks to a wonderful thing that has happened. Jasper, the trad scale Percheron model I've been working on (forever!) has been accepted into the RESS Windward program!!
  • The RESS Windward program was set up to help people just like me - sculptors who want to produce an accurate, well balanced and realistic equine sculpture to a high standard, but who have stalled and need a little expert help to get to that final stage.
  • Windward is a relatively new program for RESS, just one person has been involved before me. Michelle Platt entered her sculputre of a mule called Festus. The review and critique was offered by Lyn Fraley; a very highly regarded sculptor who's works are incredible; and were submitted into the RESS bi-annual newsletter called The Boat. I was just so incredibly impressed with the critique that I went for it, and was accepted for the 2009 Winter edition, which is to be released in January '09.
  • So, as I've not submitted my images for review Jasper is on hold, but when I receive my critique I'll be steaming ahead with him, and with a bit of luck might even get him finished!
  • It's been a long journey with Jasper, so far I've been working on him for over 4 years! It would be such a buzz to finslly get him completed and cast, even if just for a few copies for myself.
  • More to come!

New Beginning

I'm going to be blogging a few times over the next few days, I'm so far behind with reporting all the things I've been up to, and a couple of non-arty things just HAVE to be reported! . First up, this is "Little One", although after putting the title "New Beginning" on this posting I'm fancying that for a name too - what do you think? . This is a regular traditional scale (ie not large trad, not small trad either but will suit most mares Lg Classic to Trad size) foal, in my mind she is a couple of days old - still sleepy and vulnerable, but dry, fluffy, well-fed and comfortable. She's of no specific breed. I got to this point (image below) using a softer grade of clay, I knew I wouldn't be able to complete the model in that clay, but it made it so much easier to push it around and try out all the poses possible, before I set my heart on this one. I wanted to show her all tangled up with her back legs crossed, but my first design had her legs crossed above the knee, and after failing to find any good reference images I did find a couple of foals with their ankles crossed like this. She's curled up tightly and I really like how this pose shows off all that I was aiming for in the above paragraph. . I knew when I made this model that I'd have to re-make it in a harder grade of clay in order to complete it. The soft stuff just doesn't hold the detail well enough for me, and is easily damaged or accidentally "squished". The photo bloew shows the original model (from above) on the left and the new, harder grade one on the right. The head was originally made separately out of hard-grade clay, so will just transfer across. This does make for quite a disturbing sight though!
The new copy has a way to go before it portrays my original design satisfactorily. Until then I'll have both in front of me each time I sculpt. The hard clay makes for much slower progress, so will take a while before I can make it accurate to the original. Then I'll need to make it accurate to a real foal! After that the fun will begin with details, but I must must MUST resist that urge until all the bits are in the right place.
.
I'm really enjoying this new project, I have several in-progress models on the go or on hold, but I really felt the need to begin something fresh and new, it's been a long time since I completed a fresh sculpture!

Tuesday 4 November 2008

N.B.

Note - Amber may appear a little "odd" looking - this is because she has no whiskers yet! I have yet to buy a good white pen that I can use in this situation, and didn't want to ruin my work so far by trying to produce whiskers using paint.

Another little sketch

Is it November already?!?! How'd that happen? I finished this little sketch last night, it measures about 4.5" wide (the drawn part, as it was done on a corner of an A3 sheet). I used my Faber Castell PITT pens for this; the same pens I used on the horse sketch in my last post. This is a drawing of Amber, one of our two Bengal cats.
I also have a new commission! I've been asked to draw a portrait of a gorgeous golden coloured German Shepherd dog, as a gift to his owner who lots him earlier this year. I'm going to be using pastel pencils for this one, and it is being drawn on a larger paper than I've used previously (I like small!) 16"x12". I've only done the eyes and part of the nose so far, but I can already see the difference with using pastels over normal coloured pencils, the colours are far more vibrant! More on that portrait later, as I've not taken any pics to share yet.

Monday 27 October 2008

Oops! Missed off the list of rescues from my previous post - here it is:

Horse Rescue's sponsored by TIBBP:

Fund-Raiser raffle

  • Hi All!
  • Today's blog is a bit of a plug for a raffle that is currently being held by my good friend Janice Williford, who is a fellow member of the The International Blessed Broodmare Project (TIBBP).
  • I may have mentioned previously, in my "drawing" phase a few weeks back that I had produced a little pen sketch inspired by an image I just found online. Well I wanted to donate it to TIBBP but wasn't sure how to present it. Janice told me to get it sent to her and to let her deal with finding a little frame and hopefully it could raise a few dollars (pounds, euros, yen...) for the cause.
  • Below is the sketch, that pad is about A5 size so it's not huge, you can even see a bit of a scale rule behind it which may illustrate the size too. In this photo the drawing is unfinished.

  • Well, Janice has done an amazing job of turning this little drawing into a lovely piece of art; she found and bought a beautiful frame that tones with the drawing perfectly, and also had a piece of matting (I call them inserts but I'm not sure of the official term) made up, with a very attractive double-cut to it which frames the image very nicely indeed!
  • Here is a photo that Janice took of the now complete artwork that is being raffled off. I will copy the terms of the raffle below as I don't want to miss anything out.

  • The artwork is the ORIGINAL drawing I did, it is signed and dated by me and I can supply all in-progress images to authenticate this if requested.
  • Tickets cost just $5 each, and ALL proceeds will be shared out in $25 blocks to the list of rescues that TIBBP supports (listed below).
  • There is no need to contact me about entry into the raffle, all queries should be directed to Janice but if you would like to contact me first then that's ok.
  • Good luck to all who enter, it'll be interesting to see to which country this piece is destined!

(The following text copied from the TIBBP Yahoo Group message from Janice, bullets added to help it read easier as blogger doens't like paragraphs!):

  • The link below shows the original artwork up for Raffle - tickets are only $5 each.
  • http://good-times.webshots.com/album/563575388RVcCqV
  • I will accept NON CREDIT and NON DEBIT PayPal, personal Checks, Postal Money orders for the tickets. Please email me if you need my address to mail a payment in, or you can paypal (NO CC/NO DEBIT CARD) to the following (piece the email together to use it please!) email address :
  • wistfuldreams2 (at) earthlink (dot) net
  • Please note in the PayPal subject line: TIBBP RAFFLE and in the comments how many tickets (although I SHOULD be able to add it up...heehee!) AND your mailing address should you win. IF sending payment by mail, please provide an email address for me to send you your ticket numbers as I will NOT be mailing stubs to people - this is a FUND RAISER not a fund spender! HEE! I will use the address off of your check or MO stub for the mailing if you win, so be sure they are correct!
  • Please feel free to forward this to your other Yahoo Groups that might be interested and ALLOW this sort of thing!
  • Thanks for looking and reading, hope to see your names popping up for raffle tickets! This item will make a LOVELY Christmas present so get your Raffle Tickets TODAY!! Janice Williford - Sales Manager for The International Blessed Broodmare Project.

Friday 24 October 2008

...Fun Frodo, continued...

  • Continued from my previous post; this is the "shrinky" cast of Frodo, next to a full sized copy. As you can see it's about half the size, which not only adds to the "aah" factor, but also means I can afford to use the more expensive (and exciting) materials when I come to make copies.
  • I actually made this copy back in July, but it's been on hold for a while, just in case you remember it from my July postings.

  • This is NOT the final prototype for the little run of models I wanted to make; I wanted to remove the border, shave down the background part at the top to re-centre the sculpture, and there were a miliion teeny tiny pinholes (50% of the size they were when it cast, so even more fiddly!) that needed sorting out.

  • As this copy was made from the special resin, it was rubbery and flexible, which is no good for making these changes on. So I made a mold of this, and took a normal resin copy to work on.
  • After doing as much as I felt necessary, I took a mold from my new prototype and the made the first finished copy....
  • ...so I thought! The photo below shows this first copy, it's a brass head on a slate background, and has been treated on the mane, eye and nostrils with chemicals to darken them. As you can see this copy if far from perfect - there are an uncomfortable number of pinholes still there, and the background isn't as smooth as I'd hoped.
  • I still felt this model was pretty cute, and was very pleased with the effect hat the chemicals had on the brass - I've had mixed results using chemicals like this so this model was a good learning experience, and made a pretty little gift to a little girl I know who likes ponies!

  • So finally, after taking ANOTHER cast from the new mold; filling in many many pinholes and making a couple of adjustments, I had a second Prototype, which I'm happy to say was much more successful, it is the white model pictured below.

  • I had to be a bit more clever than usual when I made this prototype - now that I have my great new vaccum casting machine I have to bear in mind that during the vacuum process the poured resin expands as the air inside it is expelled. This has lead to a few messy encounters and I was keen to avoid these with this little guy!
  • As you can see, although the background to the model is actually only about 5mm thick if that, I built up the base using clay and Lego (Lego is a handy thing to have around during mold-making, I've discovered!) to give a deeper mold and allow any expansion of resin without spillage.
  • This copy looks quite dirty as there was some slate residue left in the mold from the first cast; not very good practice on my part to be honest, oops!

  • So, with the new prototype I was ready to make a (third and final) mold, ready to make lots of funky little colourful copies!

Wanna see the results? Here they are!

Inspiration restored!

  • Well, I'm VERY pleased to be able to say that my artistic block didn't last for long, and soon after my last post I was back to work again!
  • I've gone back to bullet-point style blogging as my last few posts have lost all the paragraphs again, which makes them hard to read and really annoys me!
  • I mentioned in my last post that I was working on a model for the MECs Championship show, I kept it a secret until the show but can now reveal what I've been up to.
  • The model began life as a copy of my sculpture "Frodo" from last year; I wanted to produce a smaller version that I could cast in lots of fun colours (which are expensive sadly).
  • Other artists have produced reduced size copies of their sculptures - some do this using rapid prototyping , some do it by completely re-sculpting thier model in a smaller scale. I didn't have time to sculpt a model for the MECs, and don't have the resources to pay for expensive scanning and reduced size 3D printing (which also reduces details), so, after much research I invested in some pretty interesting resin that when dealt with properly, shrinks over a few days/weeks whilst still keeping all the details crisp and clear.
  • The resin isn't the nicest stuff to use; it cures in seconds, so took a few attepts to get a half-decent cast. As the resin is mixed with water prior to pouring (the evaporation of the water causes the shrinkage), the cast felt cold, sweaty, and jelly-like (bergh!). Very quickly the water started to seep out of the resin causing it to shrink. This photo shows the model about an hour after it was cast, the lollipop sticks were placed tight around it when first cast, so you can see it has already begun to downsize.
  • I took two copies with the new resin, mixed at slightly different ratios (to "hedge my bets" at getting at least one good one).
  • The photo below shows the two casts next to a solid (normal) resin cast in black, for size comparison. As you can see, the copy on the left has had a head-start and has already shrunk by quite an amount.
  • The photo below shows the progress after a few days - the resin turns from white to brown during it's transformation. The black model is a solid resin copy, for size comparison.
  • You can also see in this photo another experimental model; this is a copy of Fly Fishing that I took using another unusual resin that GROWS instead of shrinking!
  • Both types of resin grow/shrink at varying rates depending on the thickness of the part, so at these stages the casts are all looking decidedly warped! This does even out though, when they're finally done changing.

  • Below is that same giant Fly Fishing model shown once it was fully grown - the resin becomes very fragile as it grows and as you can see this copy has lost an ear from the top horse, but as an experiment I was very impressed! I am hoping to try this method out on another of my sculptures, but for the moment that has to wait for a few other projects to be completed first, and for me to find the funds to deal with a larger model (each copy will need much more mold rubber, more resin, more filler....)
  • Sadly this resin is perishable, so the large copy shown below had to be disposed of. The other copy shown is a metal cast cope, and is nicely illustrating just how shiny and metallic these casts can be!

  • Back to Frodo! The photo below shows the finished shrunken casts next to that same black copy. As both turned out reasonably well (lots of pinholes etc but those were to be fixed at a later stage) I chose to go with the smaller of the two, pictured on the left.
  • This copy is almost exactly 50% of the size of the original copy. Just the right size for what I had planned...

  • To be continued.....
  • (please contact me if the photos cause problems with email updates, I'll try to limit them to 5 per post)

Thursday 9 October 2008

You can lead a horse to water...

...but you can't be artistic if you're just not in the mood! . As I found out yesterday! . Ok let me put a bit of background into this - The MECs are next weekend, the MECs (Model Equine Championships) are the annual finals for the year's showing here in the UK, a model has to qualify to enter, very similar to NAN realy, but on a smaller scale. This year, I've sponsored a ring (the AR ring, yey!) and have some plans for awards and a surprise class or two, so I've been working on making the prize models (which I'm keeping secret until the show). On top of this I'm working on another (secret) sculpting project and trying to give a bit more time towards my recent drawing obsession. . Well, yesterday was a bad day; it started with a disagreement with colleagues, an upset friend and a computer that wanted to take an AGE doing anything (it's doing the same today, so I'm blogging while I wait for it to catch up), continuing when I got home and opened the post to find I'd underpaid a recent bill, resulting in a charge and another letter that appeared very threatening (turned out it was just "protocal" and was meaningless), and finally ended when, after looking to Adam to cheer me up and finding he'd also had a bad day we did't speak for abut an hour. I fixed that up by making some home-made coleslaw (with cottage cheese, lettuce, raisins and sunflower seeds - aka whatever needed eating up) which definitely broke the ice between us, and was amazingly quite nice (VERY odd for my cooking!). . Which brings me back to the point of this blog - after dinner last night I had a spare hour or so, and wanted to make the most of it as I rarely get that opportunity. So I sat there, and for the entire hour I fretted about "I need to do something" but I just couldn't get myself inspired enough to work on anything! . This is the first time I've found myself unable to bring myself to be creative - I've had a block before where I don't know how to progress, but never a complete lack of inspiration or inclination to approach any of my projects! It came as quite a shock to my system, but it did show me that a) my life is normally good, good enough to keep me constantly inspired, and b) yesterday WAS stressful, however unreasonable I felt about being a grumble guts. Oh, and c) my cooking tastes better if I crash about the kitchen in a foul mood when making it, hehe! . There's no more point than that to this blog, I was just so shocked at not being able to be creative, that I felt the urge to blog about it.

Friday 26 September 2008

A world full of colour

Colour: it's a whole new world! Perhaps because I've been concentrating so hard on sculpting this past few years, now that I've rediscovered colour I just can't stop myself! . Now, I'm not going to allow myself to get into colour-theory, I have enough to study with the horses! But, I do want to know what effects all my new (and old) pencils will give me, so, inspired by a fellow blogger I decided to make up some little colour charts to use as reference when I need to decide what medium to use for a drawing. I only got the following done in the whole evening I spent working on them, but am pretty pleased with the outcome. I tested the pencils on the little A6 sketchpad that came in my previous post, and the pens were tested on A5 Bristol Board, as that is what I'll be doing any pen drawings on. . First up, the Graphitint pencils. This photo was taken under artificial light indoors as it was night time, but although the flash has reflected on the dry squares, the colours show well on the water-brushed samples. The top row is of squares just coloured using the pencils, the second row has a drop of water added but not aggitated (to see if just adding water has an effect) and the third row was washed/dragged with the waterpen that also came in the new kit (fantastic little brush, self-cleaning too!), the image has rotated, blog sometimes does this and I can't fix it, sorry. This is the same page a few hours later, when the bead of water had evaporated. The camera's flash washed out the depth of colour in this image, but as an acutal reference sheet it should be quite handy, especially being so small (A6).

The following sheet was to compare some of the pen sets I have - I LOVE pens, I don't know why but the simplicity and straightforwardness of the colour has always fascinated me. These are just some pen sets I had hanging around, I thought I'd compare them. The result of this - I want more of those Letraset type markers!! As you can see I "shaded" each square by frist drawing horizontal stripes in each box, then allowing to dry; then I drew vertical lines halfway along each box crossing the first layer, allowed to dry, then horizontal lines again halfway down each box, filing the gaps on a single layer; and finally I coloured in the top-left corner for a multi-layer shade. This gave me effectively 4 shades from each pen. With the Letraset pens I also coloured a full box as they have a broad tip too, I just love how they blend into a smooth colour!

More pens - this time a little more serious - this sheet shows all 48 colours of the Faber Castell PITT pens, shaded as above and labelled with the number and name of each colour. Previously I've only been concerned with the numbers on each pen, but knowing the names actually helps when choosing colours. For instance, there is Dark Phthalo Green and Light Phthalo Green - I may not have seen that these were shades of the same colour without seeing the name there. I made a mistake on the Pink Madder Lake/Magenta, but will cut out a fresh piece of board and stick it over the top, this chart took me so long to do I don't fancy starting over! I've also noted the three colours that I have in the fineliner pens too, as a quick-reference as to which shade they match up with (ok black's quite an easy one, but Sanguine could be mistaken for Terracotta or Indian Red). ...and finally (for now :o), here is the brief chart for the Derwent Tinted Charcoal. I'd quite like to make up a chart overlaying each colour on top of the others, and might do that if I get a chance, but for now I at least know what each colour looks like on paper. I gave this, and the Graphitint page a couple of coated of fixative to make sure they stay true and don't smudge everywhere! The pages on the A6 pad are perforated, so I may detach these charts and keep them filed together with the larger pen ones somewhere when I have more done.

Following another expensive day, I now have a set of 24 Derwent Inktense pencils on their way to me, which I will definitely be making a chart up for. The interesting thing I've heard about these is that you can only wash over them once - makes me think of acrylics and how you can paint with them using water but once dry they are waterproof. I don't even know where to start on a chart for them!! I've not yet made up a chart for my set of 24 Derwent Soft Drawing pencils, a few other small sets of pens and pencils or my posh 21st birthday 120 set of Derwent Artists pencils - they may take a little while to complete!

All these colours... and all these ways to use them - this is so much fun!!!

Tuesday 23 September 2008

More Distractions...

My enthusiasm for the more two-dimensional artwork has taken over reently; whilst visiting Adam's parents last week I took the opportunity of making a little sketch of Sox, their Border Collie dog. He managed to stay in this position just long enough for me to get a quick sketch!
I gave that sketch to Adam's Mom, she really liked it. She said she'd like a nice portait of him and would I do one for her. Ok, no pressure there then, hehe - I TOTALLY fancied the challenge so got sketching some more; this pencil drawing was done from a photograph and gave me the confidence I needed to take on a full portrait.
.
And here is the portrat so far, it's unfinished but not far off now. This is a coloured pencil drawing using a combination of Derwent Artist's pencils, Watercolour pencils and Drawing (soft) pencils on Daler Rowney Ingres 12"x9" Pastel (160g/m 98lb) card in dark brown.
.
I've paid for diving in with little research and being so ill-prepared! With this being my first attempt at such a drawing I didn't realise that the heavy grain in the paper makes it difficult to make really dark areas bold - the grain shows through. So, for instance on the very dark area on the dog's left cheek, no matter how many times I'd go over it with a dark pencil, the brown grain of the paper shows through. I've since discovered that the reverse-side of the paper is smooth (doh!) but I think for my next one I might lay down a watercolour wash before I start.0
.
I'm quite pleased with the actual portraiture of this drawing, it does look like Sox the dog, but I really feel that there is much more to discover with this relatively new medium, and yes, I managed to get a nice big smudge on the paper! I'm hoping to be able to erase it, but if that doesn't work I will shade the background with soft pastels, I had originally planned to but decided against it as the drawing developed.
.
I have had SO much fun with this portrait, I've searched the internet to observe the styles of other artists and I've discovered that there are a multitude of different types of coloured pencil too - I have been using a box of 120 Derwent Artist's pencils that I received from my family for my 21st birthday, and a few other pencils from my school days. I've not really drawn very much since then, being distracted with modifying cars (I was dating a mechanic at the time, hehe) and sculpting in recent years, and I've never used water soluble pencils in the way they are designed for. There are all these new types of pencils out there, so....

...I bought a few to try out!

Now, I have to point out here - eBay is my best friend lately! Prices are good, especially if you live in the US as the prices seem to be WAY below those in the UK. First up, a set of Derwent's tinted charcoal. These pencils got me curious, and as I was struggling to show the varying tones in Sox's black and white coat, I thought they'd be worth a try out.

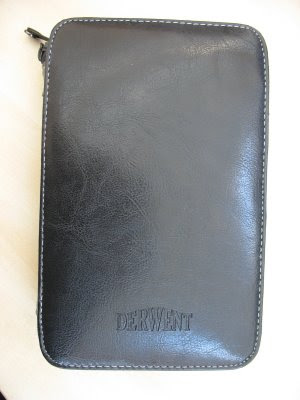
Second, and this was an absolute bargain from eBay for a whopping £1.46! This is a brand new and unused (was still packaged) Derwent Sketching Folio which is a zip-up, 2-compartment case containing all these:

  • 12 Graphitint Pencils (another Derwent product that got me curious, more about those in a moment)
  • 3 Watersoluble Sketching Pencils (no idea what to do with those yet)
  • 2 Charcoal Pencils (light/dark - should work well with my new tinted charcoal set!)
  • 1 Derwent Hardback A6 Sketchbook
  • 1 Waterbrush (these alone cost near £5 in HobbyCraft!)
  • 1 Palette
  • 1 Plastic Pencil sharpener (won't be using this as I have my trusty Faber Castel one now :o)
  • 1 Plastic Eraser (will apprach this with caution, the firmer erasers can ruin a drawing rather than improve it!)

So, quite a good buy I reckon. Now, here's the case, I don't think it's real leather but it looks pretty nice, it's a good size for travel and is padded and stiff so should protect the contents well. It also has the logo on, which although a minor thing, will be invaluable for me when I come to look for this later on, as we have so many CD holders that look similar (Adam is in I.T.), it'd be easy to lose in our house!

This is the first section, which contains the Graphitint Pencils and the A6 pad - the pad has a pocket to tuck into, so it's not loose and it won't fall out when unzipping the case. Also in this section is one of the Sketching Pencils, labelled "light wash".

Graphitint pencils are bizarre, they are in subtle, dark shades but when you add water they become much more vibrant. I'm looking forward to having a play with these; I was drawn to their subtle shades but feel the need to add water and see what happens!

This is the second section; it has the other two Sketching Pencils, predictable labelled "Medium Wash" and "Dark Wash"; and a Dark and a Light charcoal. It also has the waterbrush, which is basically a hollow tube that you fill with water that then feeds into the brush part. I'm looking forward to seeing how this works with the water soluble pencils! Sharpener and eraser, they look pretty basic, and the palette is also basic made from what appears to be vacuum formed plastic (quite think though).

All very neat and tidy! I especially like this little feature (what can I say, it's the small things that intrigue me!); at the ends of the zips, there are two press-studs to keep the zip pulls from flapping about, how neat!!

It's only by accident that most of the materials I've bought recently are made by Derwent. I try to balance value with quality, and unless I decide to go professional with my hobby (oh, to dream...), then I will be sticking with this level of product. I always keep my eye on the Faber Castell and Caran D'Ache pencils etc, but they, for now, are beyond my budget. All things considered though, I have to say how impressed I am with the range that Derwent offers. I now have a sample of each of these types, and will report back when I've done some more playing!!

  • standard (graphic) drawing pencils
  • Fine Art coloured pencils
  • Watercolour pencils
  • Soft Drawing pencils (in roll-wrap - very handy!)
  • Tinted charcoal
  • Standard Charcoal
  • Water Soluble Pencils
  • Graphitint

I have my eye on a set of their Inktense pencils too but I think I will stop then - they have plenty more variations on the simple coloured pencil should I get bored too!

(apologies for the random typefaces in this posting, I haven't quite got the hang of this blogger yet [still], and for being so nerdy about pencil crayons!)

Monday 22 September 2008

Distractions!

It's the Autumn equinox - that's it, Summer's offically over (did you see it?)! The fresher weather certainly brings with it new energy and an urge to speed progress up on projects, perhaps due to the dwindling evening light and more limited hobby opportunities. Time to get moving on those ongoing projects...but...
.
I'm just SOOOO easily distracted! Recently I bought some pens; Faber Castel Pitt Pens to be precise. I bought a pack of 4 black (superfine, fine, medium, broad), 4 Sepia (dark brown), 4 Sanguine (orangy brown) and a set of shades of grey (all broad, brush-tipped). Around this time I had also discovered an old sketch book from my school days which reignited my passion for two-dimensional creativity. Here's a couple of examples from back then (please bear in mind I was still at school then);
Sea-horse - Rotring technical drawing pens and Winsor and Newton Inks

Big Lizard - Tattoo design (unfinished)

New Year horses - a lesson in Perspective (NOT Anatomy, hehe! Cool manes though!)

Abstract horse - I always wanted to reproduce this on a BIG canvas, using glow-in-the-dark paints on a black/dark blue background. One day...

With my inspiration burning away I got to sketching and found a photo I'd taken of a horse that I pass daily on my commute to work. The horse is one of a group of three, one old-boy gray draft mix, a regular horse, and this one who appears to be a Clydesdale cross, I'd taken a few snaps months ago but when I came across the photo I thought my new pens were just the right range of colours, so got drawing and this is the result.
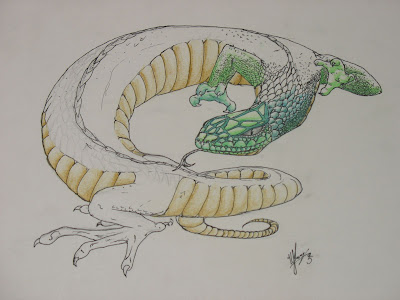
I have to admit; although it's a bit cartoon-ish, I was quite pleased with the result! I loved using the pens so much I took the plunge and bought a full set of 48 Pitt pens (a bit of a luxury I admit - all brush-tipped). Please excuse the dodgy pic, it was taken at work!
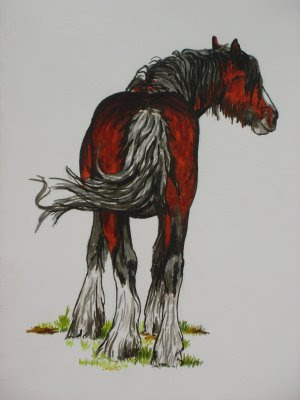
I had a dig about online for other Clydesdale type horses and came across a photo that I turned into this drawing; I can't find the photo again now, if I find it or am informed I'll happily credit the owner. I added the grass as on the photo the horse stood on a more dusty ground:
This drawing is to be donated to The International Blessed Broodmare Project (TIBBP), please contact myself or Janice Williford (email me for contact info) if you'd like more information on it. It is drawn on A5 smooth paper, and will possibly be framed.

I have to admit that my enthusiasm for drawing has wildly overtaken my energy for sculpture. But, I am definitely a slave to the phase, and will no-doubt be heading back there soon!